Difference between revisions of "Movies Page Manual 3.0"
| Line 410: | Line 410: | ||
Using this block, the OB operator is able to manage the different Age Ratings associated to this movie. | Using this block, the OB operator is able to manage the different Age Ratings associated to this movie. | ||
<br /> | <br /> | ||
| − | [[File: | + | [[File:FileAgeRatingsBlock3.jpg|thumb|Age Ratings block|center|800px]] |
<br /><br /> | <br /><br /> | ||
<big>'''Associate an Age Rating'''</big> | <big>'''Associate an Age Rating'''</big> | ||
Revision as of 11:33, 24 July 2019
Contents
- 1 Blocks
- 1.1 Basic Information
- 1.2 Movie Availability Window
- 1.3 Metadata
- 1.4 Media Files
- 1.5 Genres
- 1.6 Subtitles
- 1.7 Persons Roles
- 1.8 Images
- 1.9 Audio and Subtitles
- 1.10 Age Ratings
- 1.11 Device Availability Mapping
- 1.12 Catchup Schedule Preview
- 1.13 Pricing
- 1.14 Content Workflow Tasks
- 1.15 Importer XML files
- 1.16 Uniform Resource Names
- 1.17 HTML Files
- 1.18 Catchup URLS
- 1.19 Conformity
- 2 Actions
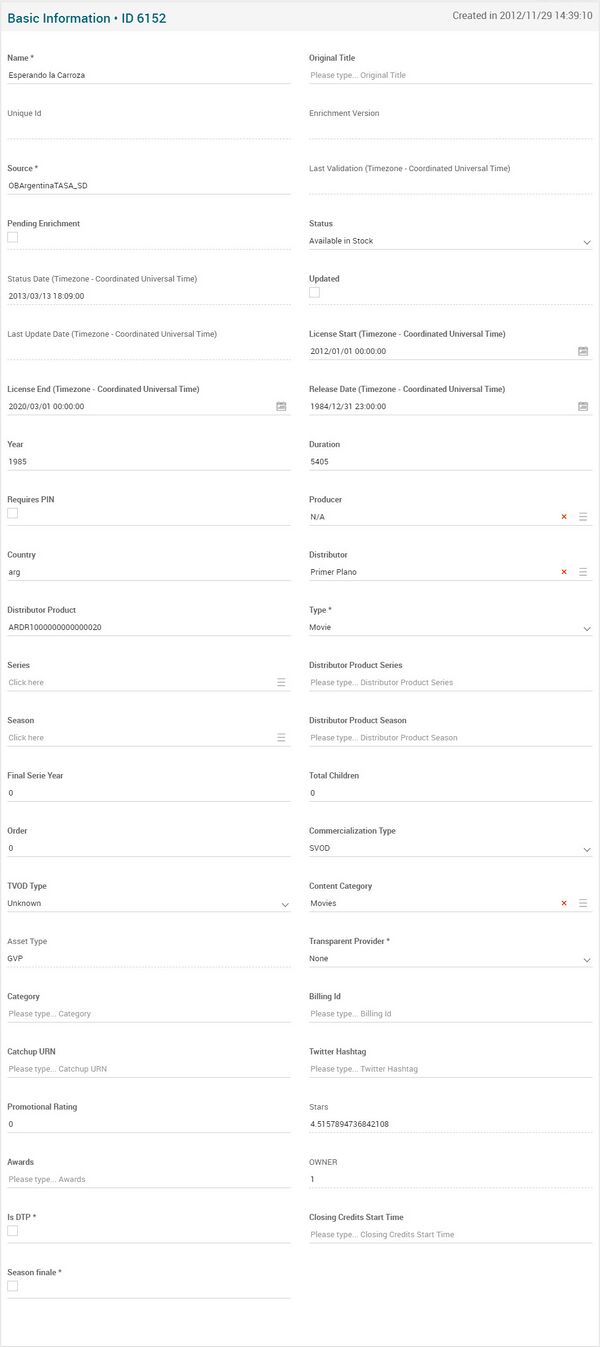
This section lists all the VOD contents available in the platform, either Movies, Series, Seasons or Episodes. Selecting one in the list, it is possible to see all metadata associated to the selected movie.
Blocks
Basic Information
| Field | Description | Restrictions |
|---|---|---|
| Name | Internal name for the movie. This name is not displayed for users (see Metadata block). |
|
| Original Title | Original movie title. | |
| Source | Controls the access and visibility of this movie for other operators. Only operators with rights over this source or its children will be able to see it. |
|
| Status | Content Workflow status: Preparation Area, Quality Area, Available in Stock, Quarantine Area. |
|
| Status Date | Represents the date of the last status change. | Read only. |
| Updated | Flag that indicates if the movie was updated or not (through ADI.XML update). | - |
| Last Update Date | Represents the date of the last movie update (automatic update). | Read only. |
| License Start | Start date for the movie License Window. See Availability Windows block for movie availability dates configurations. |
|
| License End | End date for the movie License Window. See Availability Windows block for movie availability dates configurations. |
|
| Release Date | Date when the movie was released in cinemas. | - |
| Year | Year when the movie was released in cinemas. | - |
| Duration | Movie duration in seconds. | - |
| Requires PIN | Indicates if the movie is Adult content or not. | - |
| Producer | Movie producer (Studio_Name from the ADI.XML). | - |
| Country | Country of origin for the movie. | - |
| Distributor | Movie distributor, identifying the provider of the movie (Provider from the ADI.XML). | - |
| Distributor Product | An identifier for the asset that is unique within a provider's asset ID space. The unique portable identification of an asset is the combinations of its Provider and its Asset_ID. I.e. "CLCL0000000080965907". | - |
| Type | Movie type (Movie, Episode, Season or Serie). |
|
| Series | For Seasons and Episodes, indicates the Serie where they belong to. |
|
| Distributor Product Series | Distributor ID of the Series where the Season or Episode belongs to. | - |
| Season | For Episodes, indicates the Season where they belong to. |
|
| Distributor Product Season | Distributor Product ID of the Season where the Season or Episode belongs to. | - |
| Final Serie Year | Indicates the year where the serie ended. |
|
| Total Children | In case of a Serie, indicates the number of seasons it contains. In case of a Season, indicates the number of episodes it contains. (It is not autocalculated field, to be set by ADI or operator) |
|
| Order | In case of a Season, indicates the order of the season in the Series (S01,S02, etc.). In case of an Episode, indicates the order of this episode in the Season (E01, E02, etc.). | - |
| Commercialization Type | Allows to select the commercialization type for this movie: Catchup, TVOD, SVOD, FreeVOD, External Catchup, Transparent Catchup. | - |
| TVOD Type | In case of TVOD commercialization type, indicates the type of TVOD (Launch, Catalog). | - |
| Content Category | Content Category from a predefined list of categories. Used for internal movie classification by content teams. | - |
| Asset Type | Represents the type of Asset: GVP, External Catchup, MiView TV. | - |
| Transparent provider | Name of the Transparent Catchup provider (None, FOX, HBO). This field is filled by the Importer and it only applies to movies with Commercialization Type = Transparent Catchup. | - |
| Category | A string containing the category of the film. It will be used for operators validation and reconciliation with majors. | - |
| Billing ID | Content provider asset ID to tie into royalty reporting. | - |
| Catchup URN | Unique identifier to identify the external catch-up content in the content provider site (External Resource ID). | - |
| Twitter Hashtag | To be a valid twitter hashtag, this field must be a string including the whole keyword, i.e. it must include the ‘#’ character. It cannot be longer than 140 characters (including # character). |
|
| Promotional Rating | Integer between 0 and 100 that represents an editorial rating for the movies. |
|
| Stars | Average rating for this movie by users. Not used anymore as applications don't allow rating. | - |
| Views | Total number of views of this movie. | - |
| Awards | Not used. Free text field. | - |
| Owner | Operator that created this movie | - |
| Is DTP | This field indicates whether the down to play option is enabled. This option allows devices to download the VoD contents in advance so they can be played without the need of network connectivity. |
|
| Closing Credits Start Time | Time (in seconds) when the credits begin. | This should be populated with the value that comes in the Episode ADI.XML.
If this value is manually set in MIB and there's an update where this info doesn't come in the ADI.XML it shouldn't be overwritten/unset. |
Movie Availability Window
Using this block, the OB operator is able to manage the different availability windows for those instances the operator has access to and create new availability windows for an Instance.
Create a new availability window
- Press the
 button. This will create a new empty entry row to be filled.
 - Then select the instance where you want to define the new availability window. You will only able to view those instances you have access to.
- The next step is to define the Availability Window Start Date and End Date.
- You can also enable or disable Is ComingSoon flag. This flag can be used to display a Coming Soon message in applications, but the playback/rental will not be allowed.
- Press the Save button
 in order to apply changes.
Restrictions
The availability windows definition have the following restrictions:
- It is not allowed to create overlapping windows for the same Instance. MIB will show an error when trying to save a movie with overlapping windows for the same instance.
- The availability window has to be created between the License Window. If the availability window being created is outside the License Window for the movie, MIB will show an error when trying to save.
Remove existing availability window
- Press the
 button for the desired availability window.
 - Press the save button
 in order to apply changes.
Metadata
This block shows the movie’s metadata coming from the XML metadata. New metadata blocks can be added for the different languages supported. This process is directly related with the Preparation Area in CWM. This block contains the long and short synopsis. It is a required block, without it the content will not appear to the final user.
Associate new metadatas
- Use the
 button and a multiple metadata selection dialog will open, allowing you to search and select metadatas that can be added.
 - Select the metadata to be added and press the
 button. The metadatas will be added to the movie.
 - To save changes, press the
 in the movie page.
Delete metadatas from the movie
- Use the
 button to remove all the metadatas desired.
 - Once finished, save changes by using the
 in the movie page.
Media Files
This block displays the video assets that are associated with this movie, and allows you to review the information about them such as the media type, quality, CDN mode and replication status.
Media Details
By clicking in the Edit button in the Media, it will take you to the Media Files page, so you can review more detailed information about each Media.
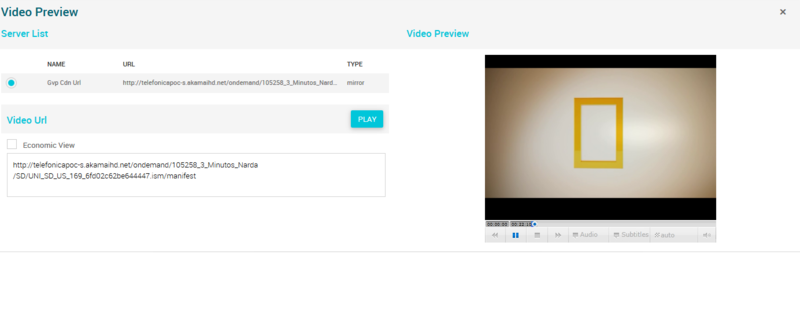
Media Preview
By clicking in the ![]() button in each Media, you can access to the Media Preview player, that allows you to watch the media inside the platform to try to catch errors or bad encodings.
button in each Media, you can access to the Media Preview player, that allows you to watch the media inside the platform to try to catch errors or bad encodings.
To play a Media File:
- Select the Origin where you want to perform playback from
- Optionally, you can enable Economic view mode. This mode allows you to perform a quick playback test that will jump automatically to 3 different parts of the video file.
- Press the PLAY button.
Double clicking on the center of the video enables the full screen, and single click pause the video.
Associate new media files
- Use the
 button and a multiple media file selection dialog will open, allowing you to search and select media files that can be added.
 - Select the media file to be added and press the
 button. The media files will be added to the movie.
 - To save changes, press the
 in the movie page.
Delete media files from the movie
- Use the
 button to remove all the media files desired.
 - Once finished, save changes by using the
 in the movie page.
Genres
In this block, you can manage the genres associated to the movie. It shows you the list of genres that are currently associated to this movie.
Associate new genres
- Use the
 button and a multiple genre selection dialog will open, allowing you to search and select genres that can be added.
 - Select the genres to be added and press the
 button. The genres will be added to the movie.
 - To save changes, press the
 in the movie page.
Note: It is important to note that most of this information comes from the “Majors” - movies distributors - (Universal, Warner) and are inserted in the platform during the ingestion process.
Delete genres from the movie
- Use the
 button to remove all the genres desired.
 - Once finished, save changes by using the
 in the movie page.
Subtitles
This block allows you to manage the .srt subtitles associated to the movie.
Add new subtitle
- Use the
 button and a new row will be added so you can upload the new subtitle.
 - Then click the
 button and a dialog will be open so you will be able to select the subtitle to be uploaded. Important:Only .srt format is allowed.
 - Now select the subtitle language and a name for the subtitle.
- Once finished, save changes by using the
 in the movie page and the subtitle will be associated.
Add existing subtitle
- Click the
 button and a dialog will open to select and existing subtitle.
 - Once finished, save changes by using the
 in the movie page and the subtitle will be associated.
Remove subtitle from movie
- Use the
 button to remove the association of a subtitle from the movie .
 - Once finished, save changes by using the
 in the movie page. This will not delete the subtitle file from the platform. In order to delete the subtitle, you will have to go to the Subtitles Page.
Persons Roles
This block allows configuring the persons (actors, director and etc) and their roles that are involved in the movie:
Associate new Person role
- Use the
 button and a multiple Person Role selection dialog will open, allowing you to search and select persons roles to be added.
 - Select the ones to be added and press the
 button. The Person Roles will be added to the movie.
 - To save changes, press the
 in the movie page.
Note: From this menu, it is not possible to create new Person Roles. Please use the Persons page to create Persons and the Person Roles page to associate a role to them.
Delete Person roles from the movie
- Use the
 button to remove all the person roles desired.
 - Once finished, save changes by using the
 in the movie page.
Images
This block allows you to manage the images associated to the movie and the information associated, such as the Type and Quality.
Add new images
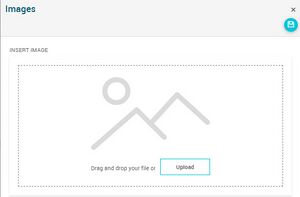
- Use the
 button and a new row will be added so you can upload the new image.
 - Then click the
 button and a dialog will be open so you will be able to select the image to be uploaded.
 - Now select the subtitle language and a name for the subtitle.
- Once finished, save changes by using the
 in the movie page and the subtitle will be associated.
Add existing images
- Click the
 button and a dialog will open to select and existing image.
 - Once finished, save changes by using the
 in the movie page and the image will be associated.
Remove images
- Use the
 button to remove the association of a image from the movie .
 - Once finished, save changes by using the
 in the movie page. This will not delete the image file from the platform. In order to delete the image, you will have to go to the Images Page.
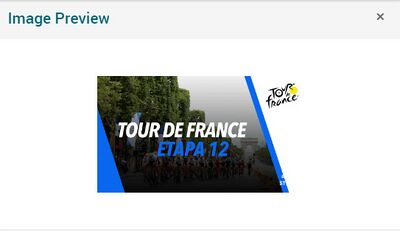
Preview images
By clicking in the ![]() button in each image, you can access to the image preview.
button in each image, you can access to the image preview.
Audio and Subtitles
This block allows defining specific default languages selection for audio and subtitle. In case it's not set default per instance is considered. It only applies when users don't define their own preferences.
Adding a new Audio and Subtitles
- Click the
 button and a language selection dialog will open.
 - We select the desired subtitle and audio.
- Once finished, save changes by using the
 in the movie page and the new record will be associated.
Age Ratings
Using this block, the OB operator is able to manage the different Age Ratings associated to this movie.
Associate an Age Rating
- Press the
 button.
 - Then select the instance for the Age Rating you want to define.
- The next step is to select the Age Ratings you want to add. Press
 button to add the selected Age Ratings
 - Finally press the Save button
 in the Movies page in order to apply changes.
Remove associated Age Rating
- Press the
 button for the desired Age Ratings.
 - Press the save button
 in order to apply changes. This will not delete the Age Rating from the platform. In order to delete the Age Rating, you will have to go to the Age Ratings page.
Device Availability Mapping
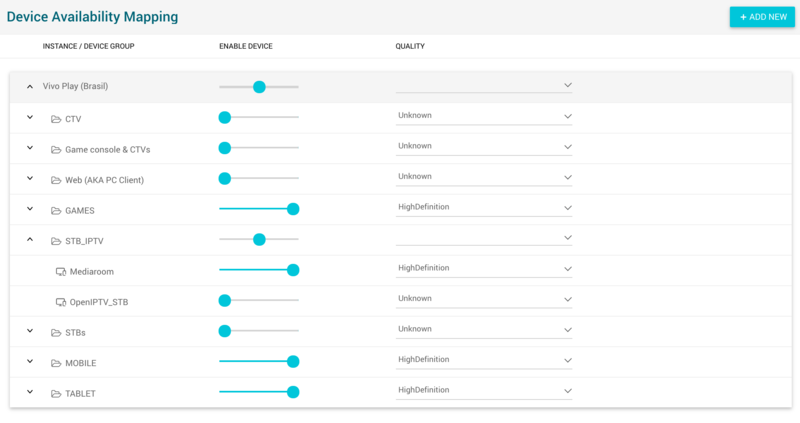
This blocks allows you to manage the availability of this movie in the different device types and instances.
The block has been totally refactored in MIB 3.0, with the objective of simplifying the operation. It has been divided in 3 different levels that can be expanded or collapsed:
- Instance level: The first level groups all the device availabilities for an instance. It can be used to enable/disable the availabilities and configure the quality for all the device types at the same time.
- Device Group level: The second level groups all the device types that belong to an specific group. Device Groups are managed globally in the Device Type Groups page. You can enable/disable the availabilities and configure the quality for all the device types of an specific group.
- Device Type level: The third level contains the specific device types, in case you want to configure the availability and/or quality of an specific device type.
Configuring availability
The sliding button allows you to enable/disable that specific level, affecting the containing sub-levels. It has 3 different positions:
 The devices contained are enabled.
 The devices contained are disabled.
 Mixed. Some devices contained in sub-levels might be enabled and others disabled.
Configuring quality
The quality selector allows you to configure the quality that will be available for an specific level. When no quality is selected (empty) for an specific level, it means that the sub-levels have different specific quality values configured.
Adding a new Instance
- Click the
 button and an Instance selection dialog will open.
 - Select the Instance where you want to create availabilities and press the
 button. The instance will be added with availabilities and max. quality for all the devices.
 - Now you can configure the different device types with the desired availability and quality.
- Once finished, save changes by using the
 in the movie page and the device availabilities will be created.
Removing an Instance
If you want to disable the availabilities for all the device types of an instance, just disable the availability in the first Instance level and save changes by using the ![]() in the movie page. That specific Instance will be removed from the Device availability mapping block.
in the movie page. That specific Instance will be removed from the Device availability mapping block.
Catchup Schedule Preview
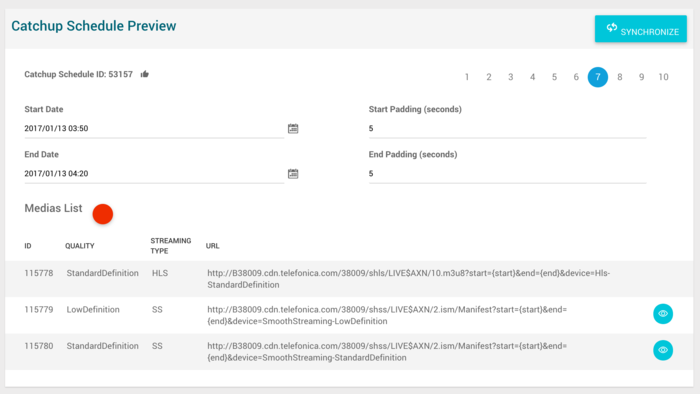
This block allows you to review all the Catchup Schedules that are related to that specific Network Catchup movie. This block is only available for movies with Type = Network Catchup.
Once the schedule has been aired, the Catchup Schedule will appear in this block so the operator is able to perform different actions.
Catchup Schedule Start / End Time & Paddings management
It is possible to adjust the start/end & paddings for each catchup schedule, as those events are generated by the EPG, and the timing info of the EPG is not always fully synchronized with the real time the event happens.
Modify the desired information and save the movie. This will mark the channel as Pending Sync and the Catchup Agent will create a sync Job for the channel where the EPG schedule belongs to. The block will display if the information has been synchronized correctly.
If an error in the synchronization, the block will display an error in synchronization and a Synchronize button will appear that will allow you to retry the synchronization.
Catchup Schedule Preview
Using this block, the operator is also able to play and review the different catchup related medias (MMEDIAS), using the Quality Check player provided. To use it, select the ![]() button in each Media and the Media Preview player will open, allowing you to watch the media inside the platform to try to catch errors or bad encodings.
button in each Media and the Media Preview player will open, allowing you to watch the media inside the platform to try to catch errors or bad encodings.
Pricing
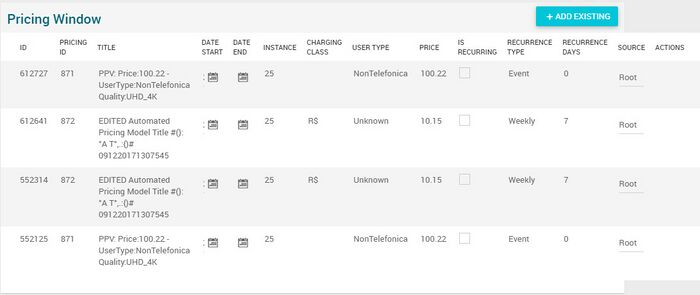
This block allows you to review the different prices (Pricing Model Groups) associated to a Movie for the different Instances.
Specify a new pricing model
- Click the
 button and a select the Instance and the Pricing Group you want to be added.
 - Then press the apply button and the Pricing model group will be associated to the movie.
- Once finished, save changes by using the
 in the movie page and the pricing model group will be associated to the movie
Default pricing models
When no pricing model group has been specified for the movie for an instance, it is possible to define a Instance Default Pricing model that will apply by default. You are not able to modify those default pricing model groups from this page, you will have to go to Pricing Model Groups page.
Content Workflow Tasks
Importer XML files
Uniform Resource Names
This block display information about Uniform resource names.
The unique identifier to identify the external catch-up content in the content provider site. When the user tries to playback the content, the content provider will ask GVP for authorization passing the external resource id value. It is typically defined (although it is open for the content provider to change the format) in urn format, colon sepated, indicating context, channel and video_id. I.e. “urn:tve:mcp”. A same content may have different URNs in each country where the content is available
HTML Files
This block allows you to manage the HTML Files associated to the movie.
Add new HTML File
- Use the
 button and a new row will be added so you can upload the new HTML File.
 - Then click the
 button and a dialog will be open so you will be able to select the subtitle to be uploaded. Important:Only .html format is allowed.
 - Now select the name and the attachment title.
- Once finished, save changes by using the
 in the movie page and the HTML File will be associated.
Add existing HTML File
- Click the
 button and a dialog will open to select and existing HTML File.
 - Once finished, save changes by using the
 in the movie page and the HTML File will be associated.
Remove HTML File from movie
- Use the
 button to remove the association of an HTML File from the movie .
 - Once finished, save changes by using the
 in the movie page. This will not delete the html file from the platform. In order to delete the html file, you will have to go to the HTML Files Page.
Catchup URLS
This block allows you to review the Catchup URLs associated to this movie.
Add new Catchup URLS
- Use the
 button and a new row will be added so you can fill in the fields.
 - Once finished, save changes by using the
 in the movie page and the Catchup URLs will be associated.
Add existing Catchup URLS
- Click the
 button and a dialog will open to select and existing Device URLs file.
 - Once finished, save changes by using the
 in the movie page and the Catchup URLs File will be associated.
Remove Catchup URLS from movie
- Use the
 button to remove the association of an Catchup file from the movie .
 - Once finished, save changes by using the
 in the movie page.
Conformity
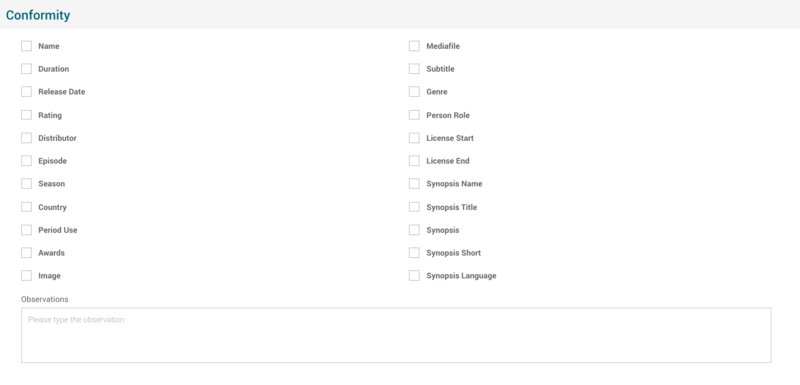
This blocks allows you to keep track of the results when performing Quality Check of the movies.
Once you have finished editing the conformity, press ![]() button in the movie page.
button in the movie page.
Actions
| Create | Edit | Edit in List | Bulk Edit | Copy | Copy with Relateds | Delete |
|---|---|---|---|---|---|---|
| (Only Series / Season) |
(Only Series / Season) |
 Create
Movie creation is enabled by default for most of the Content operator profiles. It can be used to manually create Series and Season movie contents.
- Use the
 button to create an empty movie.
 - Fill all the movie data and the related blocks.
- Once finished, save changes by using the
 button in the movie page.
 Edit
Edit
Movie edit is enabled by default for most of the operator profiles. It can be used to perform modification in the movie data and related information. Once finished modifying the movie, save changes by using the ![]() button in the movie page.
button in the movie page.
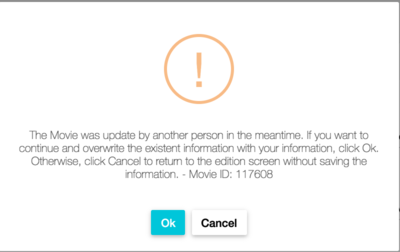
If an operator has modified a movie while you were editing, a warning will be shown indicating that the movie has been modified in another window or by another user. It will allow you to apply changes anyway and the changes from the previous user will be lost, or you can cancel and update the movie to get the latest changes.
 Edit in List
Edit in list is enabled for Movies, allowing the operator to Edit basic fields from the list view.
 Bulk Edit
Bulk Edit is enabled in the movie page, allowing you to modify several movies at the same time. However, not all the relateds blocks will be available for performing a bulk edit operation. The blocks available are:
- Basic movie information
- Movie Availability Window: No validations are applied in bulk edit mode.
- Add: This option will ADD the selected Devices Availabilities with the selected Qualities on the edited movies. There is one case that the operation will ignore the selected Devices Availabilities with its Qualities for an specific movie and this verification will work individually for each movie:
- If the Devices Availability is already present (enabled) on the movie with a Quality value. Any Disabled status will not override the present status of the Device Availability.
- Remove: This option will REMOVE all the Devices Availabilities from the selected Instance. It doesn't matter the Status or the Quality of the selected Devices Availabilities.
- Clear: This option will CLEAR (REMOVE ALL) the Devices Availabilities for the edited movies. It doesn't matte the selected Instances or Devices Availabilities on screen.
- Replace: This option will CLEAR the Devices Availabilities and ADD the selected Devices Availabilities with their respective Qualities on the edited movies.
- Add: This option will ADD the selected Devices Availabilities with the selected Qualities on the edited movies. There is one case that the operation will ignore the selected Devices Availabilities with its Qualities for an specific movie and this verification will work individually for each movie:
- Genres
- Persons Roles
- Images
- Age Ratings
- Add: This option will ADD the selected Age Ratings on the edited movies. There are two cases that the operation will ignore the selected Age Rating for an specific movie and this verification will work individually for each movie.
- If the same Age Rating already exists on the movie.
- If the selected Age Rating has the same Instance with an existent Age Rating on the movie.
- Remove: This option will REMOVE the selected Age Ratings on the edited movies. If there's no register of the selected Age Ratings, no action will be done for the specific movie.
- Clear: This option will clear (REMOVE ALL) the Age Ratings for the edited movies, It doesn't matter the selected Age Ratings on screen.
- Replace: This option will CLEAR the Age Ratings and ADD the selected Age Ratings on the edited movies.
- Add: This option will ADD the selected Age Ratings on the edited movies. There are two cases that the operation will ignore the selected Age Rating for an specific movie and this verification will work individually for each movie.
- Device Availability Mapping
- Product X Pricing Model Group
- Html's Files
 Copy
Copy
Copy is enabled for Movies with Type Season & Serie. Using the ![]() button, you will be able to clone the basic information from the movie into a new movie. The relateds will not be copied using this mode.
Once the Movie is copied, review that all the fields have been copied properly and press
button, you will be able to clone the basic information from the movie into a new movie. The relateds will not be copied using this mode.
Once the Movie is copied, review that all the fields have been copied properly and press ![]() Save button.
Save button.
 Copy with Relateds
Copy with relateds button is only enabled for Movies with Type Season & Serie. Using the ![]() button, you will be able to clone a Movie and the relateds blocks into a new movie.
button, you will be able to clone a Movie and the relateds blocks into a new movie.
The copy with relateds will behave differently for each block:
- Movie Availability Window: Copy objects (Deep copy).
- Metadata: Copy objects (Deep copy).
- Media Files: Do not copy.
- Genres: Use same IDs (Shallow Copy).
- Subtitles: Do not copy.
- Persons Roles: Use same IDs (Shallow Copy).
- Images: Use same IDs (Shallow Copy).
- Age Ratings: Use same IDs (Shallow Copy).
- Device Availability Mapping: Copy objects (Deep copy).
- Catchup Schedule Preview: Do not copy.
- Product X Pricing Model Group: Copy objects (Deep copy).
- DMM: Do not copy.
- HTML Files: Do not copy.
- Catchup URLS: Do not copy.
- Conformity: Do not copy.
Once the Movie is copied, review that all the fields have been copied properly and press ![]() Save button.
Save button.
 Delete
Delete button is not available because the movie deletion is not allowed directly from Movies page. In order to delete a Movie, you have to follow the Content Purge process. Please visit the Content Purge List page to get more details on how it works.
