Subscription Page Manual 3.0
Contents
- 1 Blocks
- 1.1 Subscriptions
- 1.2 Mediaroom Synchronization Workflow
- 1.3 Jobs Workflow
- 1.4 Live Channels
- 1.5 Temporal Live Channels
- 1.6 Event Collection
- 1.7 APPs
- 1.8 Movies Criteria
- 1.9 Services
- 1.10 External URLs
- 1.11 Images
- 1.12 Subscriptions Relationship
- 1.13 Subscription users
- 1.14 Commercial Offers
- 1.15 Device Type Availability
- 2 Actions
This section lists all the Subscriptions that compose the commercial offer available in the different services.
You can use this menu to create, modify or delete Subscriptions and to manage the contents and attributes that are linked to each.
Blocks
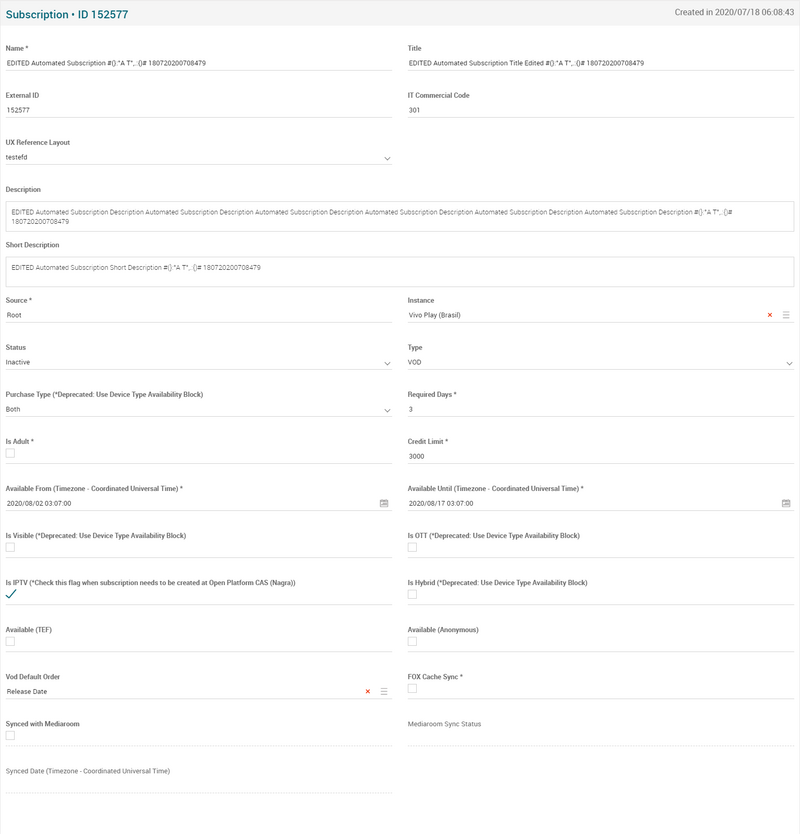
Subscriptions
| Field | Description | Restrictions |
|---|---|---|
| Streamer External ID | Pending description. | - |
| Name | Internal name. Not displayed in end user apps |
|
| Title | Title for the subscription to be displayed in the end user applications | - |
| ExternalID | External Identifier. It is used: - In top down provisioning/cancellations: always
|
- |
| IT Commercial Code | In some cases, the commercial offer (subscriptions) configured in GVP will have different IDs in different systems.
For example the same suscription "Full Cine HD" will have:
|
- |
| UX Reference Layout | Description to be displayed to the user | - |
| Description | Description to be displayed to the user | - |
| Short Description | Short Description to be displayed to the user | - |
| Source | Controls the access and visibility of this subscription for other operators. Only operators with rights over this source or its children will be able to see it. |
|
| Instance | Instance where the subscription belongs to. | - |
| Status | Active / Inactive subscription status. When Inactive, the subscription cannot be purchased or provisioned from OSS/BSS to users. | - |
| Type | Can be: Normal or Timeshift (All Playlists, VOD are deprecated, don't use them).
All Playlists Subscriptions - Not used. Deprecated. |
- |
| Purchase Type | Indicates to apps how the subscription can be purchased:
|
- |
| Required Days | Number of days since the purchase that the user will not be able to perform upgrade operations having this subscription purchased until the user can cancel it or can upgrade to a higher package. |
|
| Is Adult | (Requires Pin) Indicates to applications if the Subscription will contain only contents for adult. |
|
| Credit Limit | Credit Limit available through the Subscription:
- -1 means de subscription credit limit is unlimited. - 0 means that users holding this subscription are not allowed to purchase TVOD rentals. |
|
| Available From | Date when it will become available (visible in the app portals). |
|
| Available Until | Date when it will be unavailable (not visible in the app portals) |
|
| Is Visible | Subscription is visible in "Subscriptions Area" | |
| Is OTT | Subscription is visible in OTT applications. (Note: just OTT - BottomUp and Both subscriptions will be available in the Upselling section of the devices) | - |
| Is IPTV | Subscription is visible for IPTV STBs. | - |
| IS Hybrid | Subscription is visible for Hybrid DTH STBs. | - |
| Available (TEF) | Indicates if Telefonica users can see this subscription | - |
| Available (non-TEF) | Indicates if Non-Telefonica users can see this subscription | - |
| Available (Anonymous) | Indicates if anonymous users (not logged) can see this subscription | - |
| Vod Default Order | Indicates the default order type chosen to display the VOD contents in the subscription. | - |
| Fox Cache Sync | Indicates if the subscription has FOX content, and therefore, is synchronized with the FOX platform. | - |
| Synched with Mediaroom | Indicates if the subscription is synched with Mediaroom |
|
| Mediaroom Sync Status | Indicates the status of the synchronization with mediaroom. |
|
| Synched date | Last mediaroom synchornization date |
|
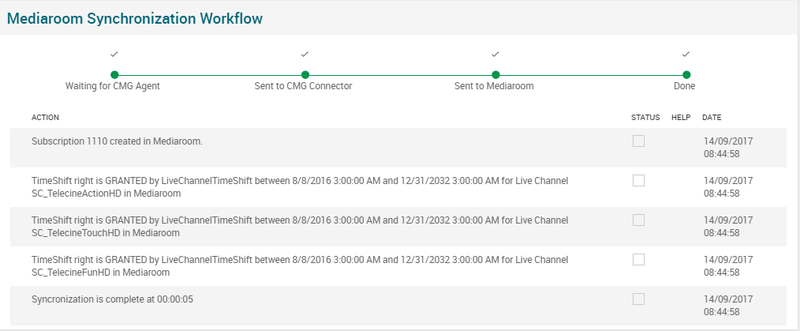
Mediaroom Synchronization Workflow
In this block you can follow the Mediaroom synchronization Workflow done by the CMG Agent.
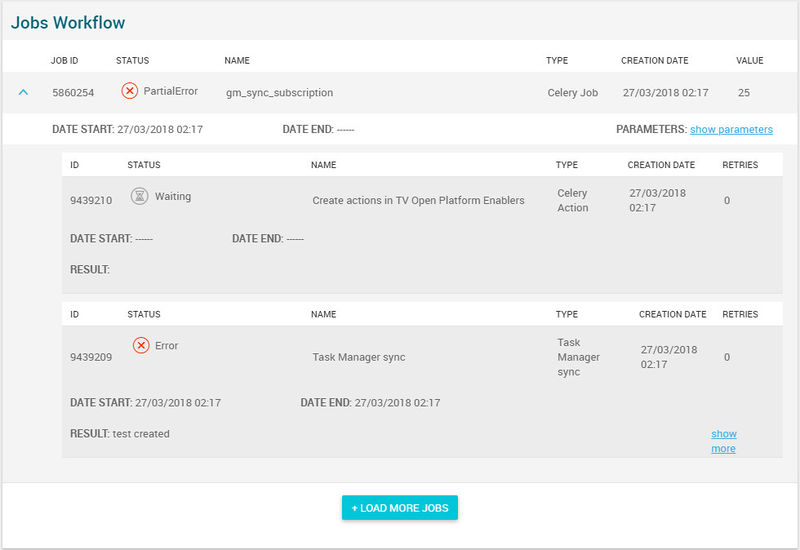
Jobs Workflow
This block shows the detail of the works related to the subscription
Live Channels
This blocks allows you to manage the different live channels associated to this subscriptions. All the users that have rights over this subscription will have rights over the channels defined in this block.
Associate Live Channels
- Use the
 button and a multiple Live Channel selection dialog will open, allowing you to search and select Live Channels that can be added.
 - Select the channels to be added and press the
 button. The Live Channels will be added to the Subscription.
 - To save changes, press the
 in the Subscription page.
Delete Live Channels from the subscription
- Use the
 button to remove all the Live Channels desired.
 - Once finished, save changes by using the
 in the Subscription page.
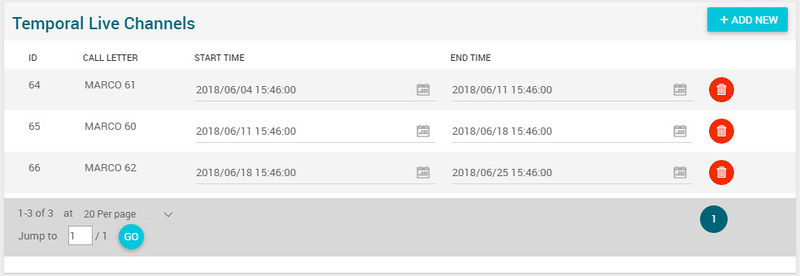
Temporal Live Channels
This block shows the temporal live channels, that offered free to end users during a period of time for promotional purpose.
Event Collection
This block allows you to associate Event Collections to a subscription. Event Collections are PPV events that are offered to the users in a SVOD model (Championships, also known as Season Tickets).
When an Event Collection is added to a Subscription, it will mean that every user with rights over that Subscription will have access to the events that are linked to that specific Event collection.
Add new Event Collection
- Use the
 button and a new Event Collections page will be open to create it.
 - Configure it and then save it and you will be able to add it using the Add Existing option.
Add existing Event Collection
- Click the
 button and a dialog will open to select and existing Event Collection.
 - Once finished, save changes by using the
 in the Subscription page and the Event Collection will be associated.
Remove Event Collection
- Use the
 button to remove the association of an Event collection from the subscription .
 - Once finished, save changes by using the
 in the subscription page. This will not delete the Event collection file from the platform. In order to delete the Event Collection, you will have to go to the Event Collections page.
APPs
--- This block allow
/
Movies Criteria
This block allows you to select those VOD Contents (Movies, Series, Seasons and Episodes) that will be available as part of this subscription. As well as the Live Channels and the Event collections, all the users that have rights over this subscription will have rights over the movies defined in this block.
To do this, the operator is able to define a set of rules, called Content Criteria Filters that will be evaluated during the Catalog Exporter process. All the Movies that match the specified filters will be linked to this Subscription.
Create new Content Criteria
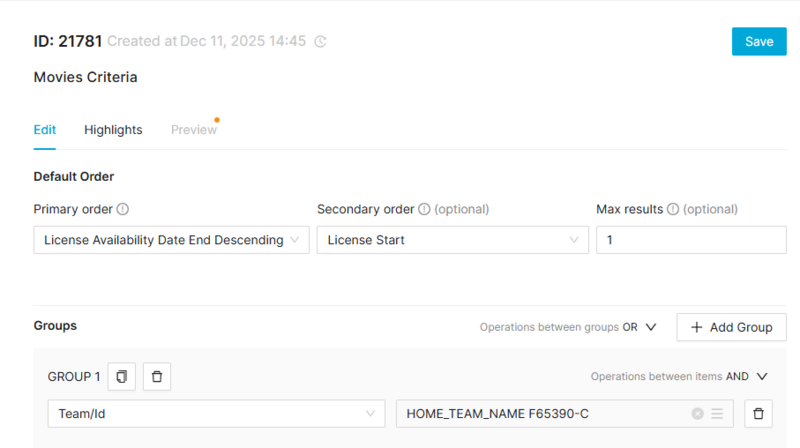
It is really easy to create a new content criteria. You only have to build an expression by combining filters that will be evaluated to select the movies that match. The expression will be composed of one or more Groups each of them composed of one or more filters and the AND/OR relationship between them. Example:
Group1 = FilterA OR FilterB
Group2 = FilterC
Content Criteria = (Group1 AND Group2) = ((FilterA OR FilterB) AND FilterC)
- First add a new Group by clicking on the
 button.
 - Then add a new Filter by clicking on the
 button.
 - Select the type of filter from the list and fill the value for the filter. There are multiple filter types available and you can combine them as you want. Some examples of filters are:
- Commercialization Type
- Content Category
- Distributor ID
- Episodes by SeasonID
- Episodes by SearieID
- Genre ID
- Instance ID
- Last X days
- Movie Type
- Person Role
- etc.
- Continue adding as many filters as desired to build the first group expression.
- When you have added all the filters for the first group, select the operator (AND / OR) that will be used to link the filters for that group.
- Now you can add a new group, go back to 1. When you have finished adding groups, select the operator (AND / OR) between the different groups.
Once finished you can continue to the Highlights section, Orders section or Preview. Save changes at anytime by clicking on the![]() in the Subcription page.
in the Subcription page.
Highlight content
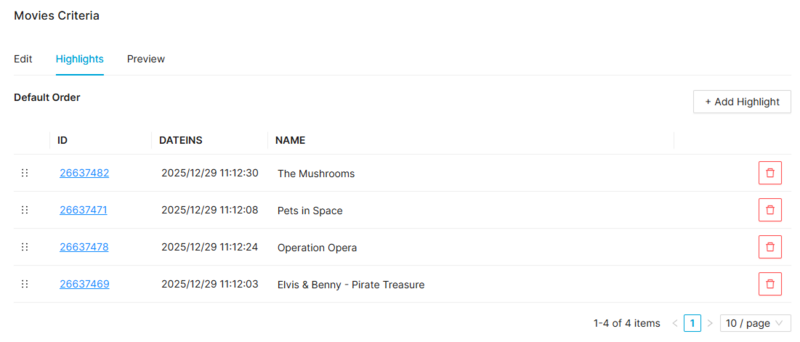
In the new content criteria, you can select some content to be highlighted. This highlighted content will be returned first when ordering the Default order is selected in the VOD channel. To do it, follow this steps:
- First click on the
 button to select movies to be highlighted.
 - A page will open allowing you to search over the different movies you have access to. Important: You will be able to select ANY movie from the list of movies you have access to. The movie will be returned independently on the Content Criterias that you have defined in the block. Of course, if duplicated, the content will be returned only once, highlighted.
- Select one or more contents to be added. It is important to understand that the highlighted contents will be ordered depending on the order they are added. So add first the contents you want to be highlighted first. In the current version of this block, it is not available the [manual ordering of highlights], it will be added in future versions.
- Save changes at anytime by clicking on the
 in the VOD Channel page.
Define default ordering and maximum number of results
In the new content criteria, you can also define the maximum number of results to be returned and the behavior of the default ordering and select what ordering criteria should be applied for those contents.
- First click on the Default Order section
- Select the primary ordering criteria from the list available:
- Duration : Ordered by duration value
- Editorial Rating : Ordered by movie Editorial Rating value
- Episode / Season Order: Ordered by movie.order value
- Most Rated: Ordered by rating value
- Popularity: Ordered by views value
- Release Date: Ordered by movie release date value.
- You can also select a secondary ordering criteria, in case some movies tie the primary order criteria
- Once a primary order has been selected, that option won't be available for secondary order
- It is also possible to define a maximum number of results to be returned by the criteria. By default, it is set to 0 (unlimited).
- Save changes at anytime by clicking on the
 in the VOD Channel page.
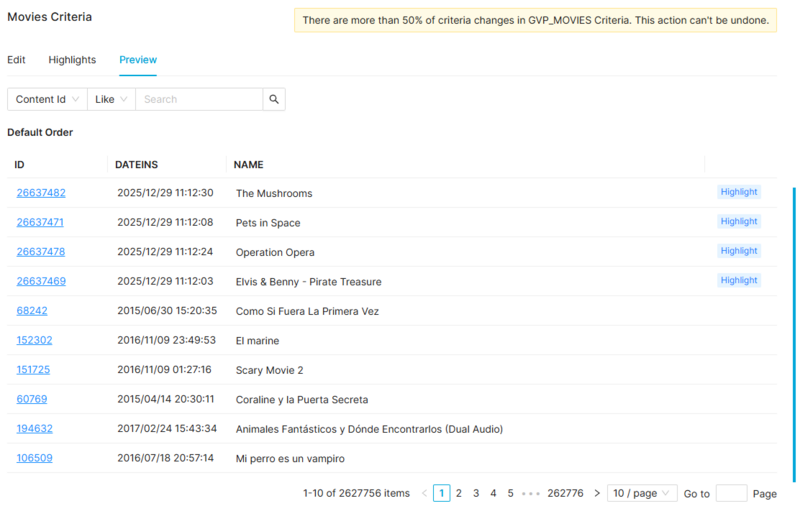
Content Criteria Preview
At any time you can go to the Preview tab and evaluate the results of the Content Criteria.
Services
This blocks allows you to manage the different services associated to this subscriptions. All the users that have rights over this Subscription will have rights over the Services defined in this block (User Services)
Associate Services
- Use the
 button and a multiple Service selection dialog will open, allowing you to search and select Services that can be added.
 - Select the services to be added and press the
 button. The Services will be added to the Subscription.
 - To save changes, press the
 in the Subscription page.
Delete Services from the subscription
- Use the
 button to remove all the Services desired.
 - Once finished, save changes by using the
 in the Subscription page.
External URLs
In this block it is possible to configure an external URL, so devices can take the user to an external Subscription page instead of taking them to the GVP Subscription page. This will be useful to allow the OB to build their custom pages in the OB Online Channel and to provide more advanced information than the one that is available currently in GVP.
Add new External URL
- Use the
 button and a new row will be added so you can configure the new URL.
 - Define the url that will apply to all devices and also you will be able to define a Device Type specific URL, by setting the Device Type for that URL, and then this URL will only be returned to that specific device type
- Once finished, save changes by using the
 in the Subscription page and the External ULR will be associated.
Once the operator has defined the External URLs for a Subscription, the UNIAPI will return in the Subscription object the specific External URL, taking into account the Device Type that is performing the request:
- If the Subscription has a specific External URL for the device type that is making the request, it will return that URL;
- If the Subscription has not a specific External URL for the device type but there is a Default URL, it will return that URL;
- If the Subscription has no default or specific External URL, it will not return any URL.
Add existing External URL
- Click the
 button and a dialog will open to select and existing one.
 - Once finished, save changes by using the
 in the Subscription page and the External URL will be associated.
Remove External URL
- Use the
 button to remove the External URL from the subscription .
 - Once finished, save changes by using the
 in the subscription page. This will not delete the Event collection file from the platform.
Images
This block allows you to manage the images associated to the Subscription and the information associated, such as the Type and Quality.
Add new images
- Use the
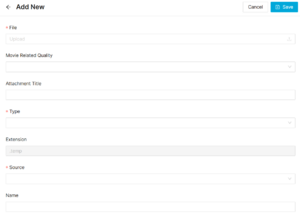
 button and a new row will be added so you can upload the new image.
 - Then click the
 button and a dialog will be open so you will be able to select the image to be uploaded.
 - Now select the subtitle language and a name for the subtitle.
- Once finished, save changes by using the
 in the Subscription page and the subtitle will be associated.
Add existing images
- Click the
 button and a dialog will open to select and existing image.
 - Once finished, save changes by using the
 in the Subscription page and the image will be associated.
Remove images
- Use the
 button to remove the association of a image from the Subscription .
 - Once finished, save changes by using the
 in the Subscription page. This will not delete the image file from the platform. In order to delete the image, you will have to go to the Images Page.
Preview images
By clicking in the ![]() button in each image, you can access to the image preview.
button in each image, you can access to the image preview.
Subscriptions Relationship
This block allows add others existing Subscriptions in the Subscription being edited, creating a relationship with it that can be:
- Upgrade: List of Subscriptions IDs that the user can purchase with this subscription owned and that will result in the cancellation of this subscription.
- - Hint: In this case, GVP is not performing any action. The OB is in charge of sending a TD cancelation. In other words, configuring this relationship has no effect.
- Incompatible: List of Subscriptions IDs that the user cannot purchase with this subscription owned. Devices are using this relationship in order to filter those subscriptions that must be hidden to a user.
- Managed Upgrade: Identifies the subscriptions that the user can purchase with this subscription owned and that will result in the immediate cancellation of this subscription by GVP side without any additional action from OB side. It is important to notice that this relationship was developed for cPVR and as a consequence:
- - Subscription cancellation is not synced with Nagra
- - Subscription is not notified to OB.
Create a Subscription relationship
- Use the
 button and a Subscription selection dialog will open, allowing you to search and select subscriptions that can be added.
 - Select the Subscription to be added.
- Now select the type of relationship (Upgrade, Incompatible) of this subscription added with the subscription being edited.
- To save changes, press the
 in the Subscription page.
Delete Subscription relationships
- Use the
 button to remove all the subscription relationships desired.
 - Once finished, save changes by using the
 in the Subscription page.
Subscription users
In this block it is possible to check the number of active subscription users. To reload the number of users that have rights over this subscription, use 70px button.
Commercial Offers
This block allows to manage the relationships between subscriptions and commercial offers. The records of this block can also be added from the commercial page.
Add new commercial offer
- Use the
 button and a new row will be added.
 - We select a record in the dialog box.
- Once finished, save changes by using the
 in the Subscription page and the commercial offers will be associated.
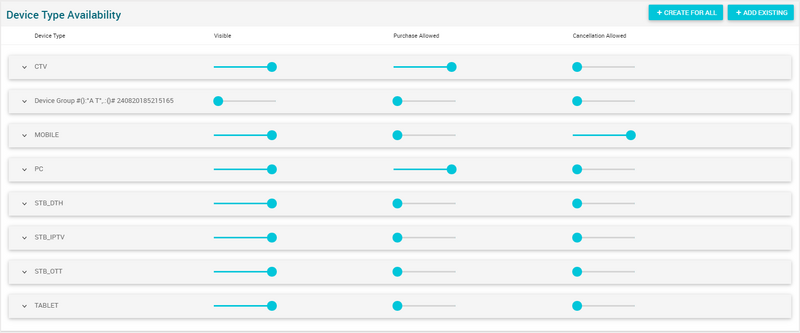
Device Type Availability
This blocks allows you to manage the availability of this VOD channel in the different device types in the instance it belongs to.
The block has been totally refactored in MIB 3.0, with the objective of simplifying the operation. It has been divided in 3 different levels that can be expanded or collapsed:
- Instance level: The first level groups all the device availabilities for an instance. It can be used to enable/disable the availabilities and configure the quality for all the device types at the same time. In a VOD Channel, it is not possible to create availabilities for different instances. It is just possible to create availabilities into the instance the VOD channel belongs to. The instance is calculated based on the VOD channel parent channel, until recursively reaches a root channel that will be linked to an Instance.
- Device Group level: The second level groups all the device types that belong to an specific group. Device Groups are managed globally in the Device Type Groups page. You can enable/disable the availabilities and configure the quality for all the device types of an specific group.
- Device Type level: The third level contains the specific device types, in case you want to configure the availability and/or quality of an specific device type.
Configuring availability
The sliding button allows you to enable/disable that specific level, affecting the containing sub-levels. It has 3 different positions:
 The devices contained are enabled.
 The devices contained are disabled.
 Mixed. Some devices contained in sub-levels might be enabled and others disabled.
Configuring quality
The quality selector allows you to configure the quality that will be available for an specific level. When no quality is selected (empty) for an specific level, it means that the sub-levels have different specific quality values configured.
Adding a new Instance
It is not possible to manually add an Instance where the VOD channel will be available. The instance is automatically calculated based on the parent channel, until recursively reaches a root channel that will be linked to an Instance.
Removing an Instance
It is not possible to remove the Instance level, as it is automatically calculated but if f you want to disable the availabilities for all the device types of an instance, just disable the availability in the first Instance level and save changes by using the ![]() in the VOD Channel page.
in the VOD Channel page.
Actions
| Create | Edit | Edit in List | Bulk Edit | Copy | Copy with Relateds | Delete |
|---|---|---|---|---|---|---|
 Create
Subscription creation is enabled by default for most of the operator profiles.
- Use the
 button to create an empty Subscription.
 - Fill all the subscription data and the related blocks.
- Once finished, save changes by using the
 button in the subscription page.
 Edit
Edit
Subscription edit is enabled by default for most of the operator profiles. It can be used to perform modification in the subscription data and related information. Once finished modifying the subscription, save changes by using the ![]() button in the subscription page.
button in the subscription page.
 Edit in List
Edit in list is disabled for Subscriptions for security reasons. You have to go to Edit Page to perform any modification.
 Bulk Edit
Bulk Edit is disabled fot Subscription page.
 Copy
Copy
Copy is enabled for Subscriptions. Using the ![]() button, you will be able to clone the basic information from the subscription into a new subscription. The relateds will not be copied using this mode.
Once the subscription is copied, review that all the fields have been copied properly and press
button, you will be able to clone the basic information from the subscription into a new subscription. The relateds will not be copied using this mode.
Once the subscription is copied, review that all the fields have been copied properly and press ![]() Save button.
Save button.
 Copy with Relateds
Copy is enabled for Subscriptions. Using the ![]() button, you will be able to clone a subscription and the relateds blocks into a new subscription.
button, you will be able to clone a subscription and the relateds blocks into a new subscription.
The copy with relateds will behave differently for each block:
- Mediaroom Synchronization Workflow: Do not copy.
- Live Channels: Use same IDs (Shallow Copy).
- Event Collection: Use same IDs (Shallow Copy).
- Movies Criteria: Do not copy.
- Services: Use same IDs (Shallow Copy).
- Images: Use same IDs (Shallow Copy).
- Subscriptions Relationship: Copy objects (Deep copy).
- External URLs: Copy objects (Deep copy).
- Subscription users: Do not copy.
Once the subscription is copied, review that all the fields have been copied properly and press ![]() Save button.
Save button.
 Delete
Delete button is not available because the subscription deletion is not allowed directly from Subscription page. In order to delete a Subscription, you have to follow a specific process:
- First disable the subscription so it gets deleted from Mediaroom. To do this, change the Type of the Subscription to VOD and press
 Save button.
 - Wait for CMG synchronization. Once the sync is successful, review in SMT/GMT that the Subscription has been removed from Mediaroom.
- Now you can proceed to execute Subscription deletion procedure, using the Subscriptions Cleaner tool.
